

4 Steps To Dockerize Your Node.js Apps
A quick guide for dockerizing Node.js apps in a jiffy

A quick guide for dockerizing Node.js apps in a jiffy

What Are Docker Containers?
Containers are a unit of software that helps us package our code and our dependencies compactly. The main advantage of this is it helps our apps to run efficiently and reliably in various environments.
When we package our code and dependencies, a Docker image is created. This image encompasses everything that’s required for our app to run, including the system tools and libraries as well.
When we build these images and run them, they become Docker containers. Once again, for emphasis, the huge advantage of doing so is to help our software run in the same exact way, no matter what OS you’re using under the hood — be it Linux or Windows, etc. This uniformity that Docker containers help us provide is crucial, especially when deploying apps for production.
In recent times, containerized apps have largely taken over the traditional method of running apps via virtual machines (VMs). VMs require a full copy of the underlying OS to run, and you can imagine how much space the overall duplication of the system’s libraries, tools, etc. would consume!
If you want to learn more, Preethi Kasireddy has written an amazing, detailed, and easy-to-understand article on Docker, Containers, and VMs here. Do check it out!
Step 1. Kickstarting a Simple Node.js App
Let’s create a simple boilerplate app on Node.js. To do this, let’s use Express.js and the express-generator. To learn more about express-generator, visit this link.
Open up the terminal, create a directory folder (e.g. my-app) and use the below command to kickstart our app. Note that Node.js 8.2.0 or above is required for this to work.
npx express-generatorThat’s about it, we will have a functional Node.js, Express-based app ready to run. To test it out, run npm run start.
Now, visit localhost:3000 and it should give a “Welcome to Express” message.
Step 2 . Adding a Dockerfile
Next, we will add a Dockerfile to our repository. Create a new file called Dockerfile and add the following contents to it.
The Dockerfile is pretty self-explanatory. In the sequence of the code, we’re:
FROM node:14.17.0: Use the Node.js 14.17.0 image. You can modify the version to use what fits your app or just usenode:latestfor the latest version. This picks an image from Docker Hub, which is a global repository of Docker images. The image we’ve chosen is based on the Ubuntu operating system.We create a working directory with the
mkdircommand under the path/usr/src/app(if it doesn’t already exist). This helps us set up what will happen in the following commands.We copy all of the necessary package files, namely
package.jsonandpackage-lock.json, to the working directory, and we install the dependencies inside the container.We copy the remaining source files to the working directory.
We build the app and expose it by opening up port
3000on the container.We run the app by using the command
npm start. You can change this to benpm run devor whatever suits your script defined inpackage.json.
Note: If you’re using yarn instead of npm, just update the respective commands (e.g., yarn install instead of npm install).
Let’s also add a .dockerignore file so that our module dependencies in the .node_modules folder are not copied over. We will be installing these dependencies on the container itself.
Step 3 . Adding a Docker Compose File
Docker Compose is a tool for running multicontainer apps. We can add this to orchestrate our apps with the Docker Engine.
Let’s add the following snippet as docker-compose.yml at the root of the project directory:
Step 4. Running The App
To run the app, we use the following command at the root of the project directory:
docker-compose up -d --buildThis command builds the image and starts it up as a container in a detached mode — i.e., in the background.

To view your running containers, use:
docker ps -a
To see the Dockers of a container, use:
docker logs -f <container_id>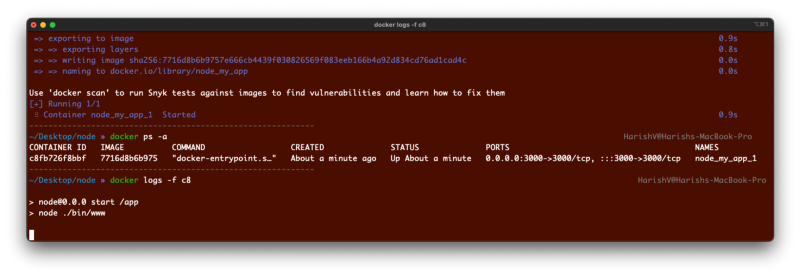
Conclusion
There you go! The simple four-step guide to dockerizing your Node.js apps.
As the next steps, you might be wondering how to configure a Nginx reverse proxy and SSL (for example using Let’s Encrypt). Philipp has written a great article on this here.
Docker can be really powerful and helpful in packaging your apps and services. Try using the above steps for your next app deployment, and leave your comments below!
Happy Dockerizing!